|
Important! Read Before Making Mash
MOTHER's New, Improved Three-step Mashing Recipe
MILLING
Shell,
clean, and grind a bushel of corn (56 pounds) into a fine meal of about the size needed for livestock feed. Use a 3/16" screen
on a hammermill (or a similar grinder) to eliminate any large starch grains. However, do not grind the corn into
a flour. If the grains are too small, it'll be very difficult to separate the solids from the mash, with a resulting loss
of feed grain and a miserable mess inside your still.
STEP ONE: COOKING
Start with
30 gallons of water in your cooker, and then add the cornmeal slowly, to prevent lumping. Once the meal is stirred in, stir
in 3 level measuring spoons of MOTHER's Alcohol Fuel Mash Cooking Enzyme (mixed in water) and bring the mixture up to 170
deg F (77 deg C). Hold the mash at this temperature for 15 minutes, stirring vigorously throughout the process. Then bring
the liquid to a rapid rolling boil and hold it there for 30 minutes more. Be particularly careful that the mash doesn't stick
to the bottom of the cooker. (For batches larger than a bushel, we recommend using an automatic agitator, which should spin
at 30 to 45 RPM.)
STEP TWO: CONVERTING
Using the cooling coil, bring the temperature of the
mash down to 170 deg F (77 deg C), and add 3 more measuring spoons of MOTHER's Cooking Enzyme (mixed in water). Keep the mixture
at this temperature for 30 minutes, while you agitate it constantly.
STEP THREE: FERMENTATION
Start
cold water flowing through the cooling coil again, to reduce the temperature to 90 deg F (32 deg C) as rapidly as possible.
Once the mash has cooled, add 6 measuring spoons of MOTHER's Alcohol Fuel Fermentation Powder (a complex glucoamylase, yeast,
and denaturant combination), stir the mash for 10 minutes, and then cover the tank.
While it's fermenting,
the mash must be kept between 85 and 90 deg F (29-32 deg C). Consequently, you may need to cover the tank with wet burlap
in hot weather, or insulate it during colder months. At this temperature, the mash will reach maturity in 2-1/2 to 3 days.
TESTING
PROCEDURES
Using a saccharometer: At the beginning of fermentation, the specific gravity
of the mash should be about 1.080 (8 to 12% alcohol potential), while by the end of the process it will have dropped to 1.007
or less (0 to 1% alcohol potential). Once the specific gravity has remained constant for 6 hours, you can be sure that the
mash is ready for distillation. But to double check that complete conversion has been attained, both a standard starch test
(using iodine) and a glucose test (using glucose test strips available at drug stores) must read negative.
YOU
MUST HAVE A COOLING COIL
To make a cooling coil, just wind a 30-foot length of soft copper tubing around a
large pipe (6 inches, or more, in diameter), and add garden hose adapters at each end. Attach the hoses to the tube, and drop
the assembly into your cooking vat.
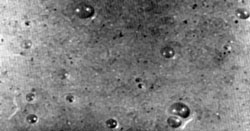
Properly fermenting mash.
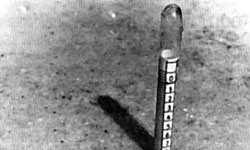
Saccharometer floating in fermenting mash.
Preparing a Mash From Saccharide-rich Materials
Alcohol can easily be produced from sugar-bearing crops instead of the standard
complex carbohydrates such as corn or grain. For example, sugar cane, sugar beets, or fruit can be processed -- by crushing
the raw material to extract the juices -- to form a perfectly acceptable mash. Furthermore, the more refined examples of sacchariferous
compounds -- such as raw sugar or molasses -- can also easily be turned into a high-yield fermentation material.
SUGAR
CONCENTRATION
Once the sugar juices have been extracted -- in a cider press, for example -- the sugar concentration
in a potential mash must be adjusted to suit the growth of yeast: between 14 and 18%. Such a concentration should be measured
with a Balling hydrometer -- sometimes called a saccharometer -- at 60 deg F. Excessively high sugar concentrations (which
inhibit yeast growth by promoting more rapid alcohol fermentation) should be diluted with water, whereas liquids with low
readings (which are wasteful of fermenting space and the energy used in distillation) should be augmented with a
concentrated sugar.
(EXAMPLE: Molasses which contains 60% sugar by weight should be diluted with three parts water
to form a 15% solution.)
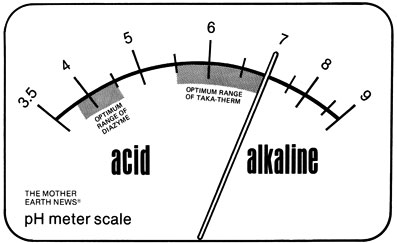
pH ADJUSTMENT
The pH should be maintained between 4.0 and 4.5 to give
the yeast a healthy environment for growth, while retarding bacterial formation. Sulfuric acid is the most common and least
expensive substance available for lowering pH, though lactic acid does the same job, while restricting the growth of butyric
acid bacteria. It's also possible to inoculate the mash with lactic acid bacteria before fermentation to provide a substitute
for the acid itself.
ADDITION OF NUTRIENTS
Some of the more sophisticated distillers actually go so far as to augment
their sugar-heavy mashes with nitrogen and phosphorus, two nutrients which sugars tend to be deficient in. A variety of ammonium
salts -- such as ammonium sulfate or phosphate -- can be added to encourage a healthy yeast culture. Such a procedure is usually
more complicated than the backyard alcohol producer should consider, but -- in the event of yeast growth problems -- some
cautious experimentation might be in order.
MIXING A YEAST STARTER
For every 100 gallons of
mash remove 1 quart of solution and add 2 ounces of dry activated yeast to it. Then allow the inoculated wort -- as it is
called in brewing technology -- to incubate for 60 to 90 minutes while holding the temperature between 77 and 95 deg F. This
technique promotes the rapid growth of yeast and speeds the entire fermentation process.
PITCHING THE WORT
Combining
of the yeast-inoculated mixture with the main mash is called "pitching". There are several ways in which the yeast starter
can be added to the fermentation tank, but the most important aspect of the process is keeping the mash well aerated. One
technique consists of using baffles which the mash flows over as it enters the tank. The splashing introduces air to the wort,
which encourages a thriving yeast population. Another approach is to place a compressed air line -- with a bacterial filter
-- in the bottom of the tank. However, for the small producer a human-powered stirrer (a canoe paddle, for example) will be
satisfactory. (Of course, once the yeast population is thoroughly established, aeration must be halted to allow the microbes
to adapt to the anaerobic conditions which result in maximum production of alcohol.)
TEMPERATURE CONTROL
 Since the temperature of the fermenting mash should -- ideally -- be around 85 deg F, the pitching temperature will be determined
by the ambient air temperature. For example, if the outside mercury is quite high, the initial temperature of the mash should
be in the low seventie, and it may be necessary to cool the wort as the yeast begins to produce warmth of its own. On the
other hand, low air temperature dictates an introductory level of 85 to 90 deg F. (Note: Any temperature over 90 deg F will
both evaporate alcohol and encourage bacterial growth.) Since the temperature of the fermenting mash should -- ideally -- be around 85 deg F, the pitching temperature will be determined
by the ambient air temperature. For example, if the outside mercury is quite high, the initial temperature of the mash should
be in the low seventie, and it may be necessary to cool the wort as the yeast begins to produce warmth of its own. On the
other hand, low air temperature dictates an introductory level of 85 to 90 deg F. (Note: Any temperature over 90 deg F will
both evaporate alcohol and encourage bacterial growth.)
COMPLETION OF FERMENTATION
Assuming
that you have properly controlled the sugar concentration, the pH, the yeast nutrition, and the temperature, fermentation
should be completed in about 50 hours. Activity will lessen in the mash, and the cap on top of the mixture will break apart
and sink once the yeast has done its job.
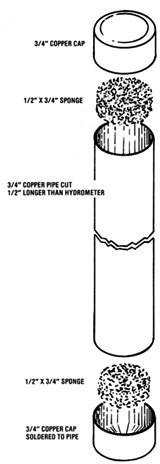
A Handy Hydrometer Jacket
A hydrometer is actually quite a delicate instrument, and will easily break
if handled roughly. By making one of these protective jackets, you'll not only guarantee that your hydrometer will be in one
piece when you're ready to use it, but also reap a second benefit: The sturdy cylinder will serve as a vessel to "float" your
proof-measuring tool in while you take alcohol strength readings.
To make the protective device, merely cut a length
of 3/4" rigid copper pipe about 1/2" longer than the hydrometer itself, then locate two 3/4" copper pipe end caps. Solder
one of the caps to one end of the tube, then cut a small piece of sponge, inner tube, or neoprene stopper to fit snugly into
the bottom of this permanently plugged end (shove the "shock absorber" into the cylinder with a long pencil or a dowel). Now
just drop your instrument into the tube, and cap the open end. If you wish, you can also glue a piece of padding inside the
removable tip. This will just about guarantee that no matter how roughly you handle the copper jacket, its delicate cargo
will remain unscathed. To use the cylinder as a vessel, just uncap it, fill it nearly to the brim with your alcohol product,
and "float'' the hydrometer in the liquid. The proof strength will be indicated on the scale stamped on the side of the instrument.
|